前言
今天来学习数据库主从同步的原理及过程,数据库主要是用来存储WEB数据,在企业当中是极为重要的,下面一起来看下。
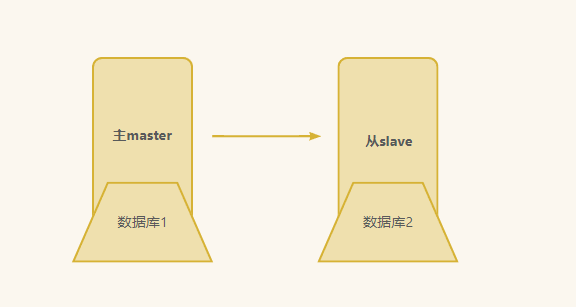
1.1 数据库做主从的目的
MySQL主从复制在中小企业,大型企业中广泛使用,MySQL主从复制的目的是实现数据库冗余备份,将master数据库数据定时同步到slave数据库中,一旦masker数据库宕机,可以将WEB应用数据库配置快速切换至slave数据库,确保WEB应用较高的可用率。
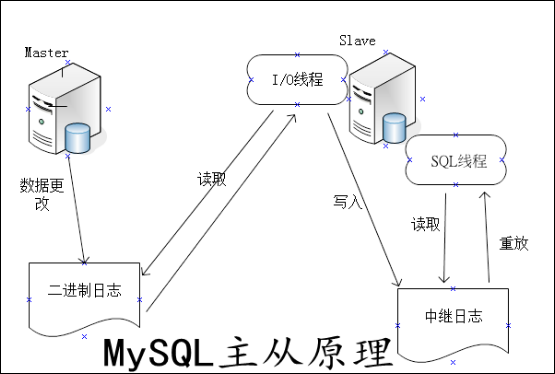
1.2 主从原理架构
MySQL主从同步至少需要用到2台服务器,一台为master库,另一台为slave库,要实现复制首先需要在master上开启bin-log日志功能,bin-log日志用于记录在Master库中执行的增、删、修改、更新操作的sql语句,整个过程需要开启3个线程,分别是Master开启IO线程,Slave开启IO线程和SQL线程。
一. 准备实验环境
这个实验需要用到两台服务器,一台是主master,另一台是从slave,实验前的准备是两台服务器都需要操作的。
1.1 关闭selinux和防火墙
必要情况下,还是建议selinux进行关闭操作,防火墙可以视情况而定,自己做实验可以直接将防火墙给关了。
#关闭防火墙
systemctl stop firewalld
iptables -F
#关闭selinux
setenforce 0
1.2 查看本地IP
查看本地IP,并测试是否可以ping通www.baidu.com
ifconfig
192.168.116.166   #第一台服务器IP作为主master
192.168.116.128   #第二台服务器IP作为从slave
1.3 服务器 数据库版本
两台服务器版本皆为CentOS7.9
[root@localhost ~]# cat /etc/redhat-release
CentOS Linux release 7.9.2009 (Core)
数据库使用MySQL8.0社区版本来做本次实验
rpm包下载地址
本次实验用到的rpm包–MySQL8.0社区版–可直接点击前面的进行跳转,也可以直接复制这个链接:http://repo.mysql.com/mysql80-community-release-el7.rpm
表格形式显示:
| 服务器版本 | IP | 数据库版本 |
|---|---|---|
| CentOS7.9.2009 | 192.168.116.166(主master) | MySQL8.0.32社区版 |
| CentOS7.9.2009 | 192.168.116.128(从slave) | MySQL8.0.32社区版 |
二. 安装MySQL8.0
这里一样是需要两台服务器都要进行安装数据库的
2.1 清空CentOS7自带的包
在CentOS7中,默认会安装mariadb的文件和包,需要先将这些给删了,否则会影响到后续的安装。
#清空现有的mariadb和mysql相关的文件
[root@localhost ~]# rpm -qa | grep mysql
[root@localhost ~]# rpm -qa | grep mariadb
mariadb-libs-5.5.68-1.el7.x86_64
[root@localhost ~]# rpm -e mariadb-libs-5.5.68-1.el7.x86_64 --nodeps
接下来查找关于mysql和mariadb的文件进行删除。
[root@localhost ~]# find / -name mariadb
[root@localhost ~]# find / -name mysql
/etc/selinux/targeted/active/modules/100/mysql
/usr/lib64/mysql
[root@localhost ~]# rm -rf /etc/selinux/targeted/active/modules/100/mysql /usr/lib64/mysql
2.2 下载安装数据库8.0
在前面官网复制的rpm源,使用wget进行下载,若wget命令没有,需要先下载wget命令。
–可直接复制
yum install wget -y
wget http://repo.mysql.com/mysql80-community-release-el7.rpm
rpm -ivh mysql80-community-release-el7.rpm
yum install mysql-community-server
安装好这几个之后,就可以直接启动服务了;
#启动服务
systemctl restart mysqld
2.3 查找初始化密码
两台的初始化密码都不一样,可以先查找出来后,将两台的数据库密码都修改成一样的。
#查找初始化密码
grep -i 'password' /var/log/mysqld.log
2023-03-23T06:39:43.463553Z 6 [Note] [MY-010454] [Server] A temporary password is generated for root@localhost: q_gkjqeR1iGA
数据库密码在冒号后面:q_gkjqeR1iGA
2.4 修改数据库密码
建议将两台数据库的密码都修改成一样的,方便后续的测试。
#使用密码登录数据库修改成新密码
[root@localhost ~]# mysql -uroot -p
Enter password:
Welcome to the MySQL monitor.  Commands end with ; or \g.
Your MySQL connection id is 8
Server version: 8.0.32

Copyright (c) 2000, 2023, Oracle and/or its affiliates.

Oracle is a registered trademark of Oracle Corporation and/or its
affiliates. Other names may be trademarks of their respective
owners.

Type 'help;' or '\h' for help. Type '\c' to clear the current input statement.

mysql> alter user 'root'@'localhost' identified by '#Admin$5^!';
Query OK, 0 rows affected (0.00 sec)

mysql> exit
Bye
修改密码的语句
alter user 'root'@'localhost' identified by '#Admin$5^!';
MySQL8.0当中,密码需要修改的尽可能复杂才会通过,可以使用语句看下复杂的程度。
mysql> show variables like 'validate%';
+--------------------------------------+--------+
| Variable_name                        | Value  |
+--------------------------------------+--------+
| validate_password.check_user_name    | ON     |
| validate_password.dictionary_file    |        |
| validate_password.length             | 8      |
| validate_password.mixed_case_count   | 1      |
| validate_password.number_count       | 1      |
| validate_password.policy             | MEDIUM |
| validate_password.special_char_count | 1      |
+--------------------------------------+--------+
7 rows in set (0.00 sec)
是否开启用户密码校验
密码文件存放的位置
密码长度至少8位
大小写字母的个数至少1位
至少包含一个数字
设置密码的级别,默认级别为中等
至少包含一个字符
以上内容都是需要两台服务器都操作一遍的。
三. 主master上操作
上面定义了主master为这台服务器IP:192.168.116.166
为了可以直观的看到在哪台服务器上进行,这里就修改一下主机名,这样就很容易区分。
3.1 临时修改主机名
[root@localhost ~]# hostname master
[root@localhost ~]# bash
[root@master ~]#
3.2 设置主数据库
创建数据库用户slave21,让它可以远程,并设置密码
[root@master ~]# mysql -uroot -p
Enter password:
Welcome to the MySQL monitor.  Commands end with ; or \g.
Your MySQL connection id is 11
Server version: 8.0.32 MySQL Community Server - GPL

Copyright (c) 2000, 2023, Oracle and/or its affiliates.

Oracle is a registered trademark of Oracle Corporation and/or its
affiliates. Other names may be trademarks of their respective
owners.

Type 'help;' or '\h' for help. Type '\c' to clear the current input statement.

mysql> create user 'slave21'@'%' identified with mysql_native_password by '#slvae21!@3LL';
Query OK, 0 rows affected (0.00 sec)

mysql> grant replication slave on *.* to 'slave21'@'%';
Query OK, 0 rows affected (0.00 sec)

mysql> flush privileges;
Query OK, 0 rows affected (0.00 sec)

mysql> show grants for 'slave21'@'%';
+-------------------------------------------------+
| Grants for slave21@%                            |
+-------------------------------------------------+
| GRANT REPLICATION SLAVE ON *.* TO `slave21`@`%` |
+-------------------------------------------------+
1 row in set (0.00 sec)
看着这图似乎很多内容,其实就只有几条语句;
create user 'slave21'@'%' identified with mysql_native_password by '#slvae21!@3LL';
这一条语句的意思就是创建一个slave21这个用户,用户的名称是可以自己定义的;@’%’表示可以使用远程登录数据库,
identified with mysql_native_password by这个语句则是MySQL8.0的固定写法,表示就是给他设置密码。
grant replication slave on *.* to 'slave21'@'%';
这条语句则是表示给这个用户授权数据库的权限,
*.*基本上就是给所有权限,第一个*表示所有数据库,第二个是表示数据库表。
flush privileges;
这条语句表示刷新数据库,让之前设置的内容可以同步到数据库中。
show grants for 'slave21'@'%';
查看之前设置的权限是否已经写入到数据库中,有显示内容表示已经写入成功了。
3.3 修改数据库配置文件
[root@master ~]# vim /etc/my.cnf
[root@master ~]# sed 4,+4p -n /etc/my.cnf
[mysqld]
server-id=21
log-bin=mysql-bin
binlog_do_db=test
binlog_ignore_db=mysql
#重启服务
[root@master ~]# systemctl restart mysqld
server-id=21 数据库服务的唯一ID
log-bin=mysql-bin 设置binlog日志的存放位置
binlog_do_db=test 设置进行同步的数据库,这条不写表示同步全部数据库
binlog_ignore_db=mysql 设置不进行同步的数据库
记得设置好之后,还有一句命令是需要重启服务的。
3.4 查看主master状态
设置好配置文件后,重新登录mysql数据库系统中查看master的信息。
[root@master ~]# !m
mysql -uroot -p
Enter password:
Welcome to the MySQL monitor.  Commands end with ; or \g.
Your MySQL connection id is 8
Server version: 8.0.32 MySQL Community Server - GPL

Copyright (c) 2000, 2023, Oracle and/or its affiliates.

Oracle is a registered trademark of Oracle Corporation and/or its
affiliates. Other names may be trademarks of their respective
owners.

Type 'help;' or '\h' for help. Type '\c' to clear the current input statement.

mysql> show master status;
+------------------+----------+--------------+------------------+-------------------+
| File             | Position | Binlog_Do_DB | Binlog_Ignore_DB | Executed_Gtid_Set |
+------------------+----------+--------------+------------------+-------------------+
| mysql-bin.000001 |      157 | test         | mysql            |                   |
+------------------+----------+--------------+------------------+-------------------+
1 row in set (0.00 sec)
为什么需要查看这个信息,因为配置slave从数据库的时候需要用到。
File 就是我们刚刚设置的log-bin的存放文件,用来记录mysql操作的日志文件。
Position 表示是偏移量
Binlog_Do_DB 需要进行同步的数据库
Binlog_Ignore_DB 不进行同步的数据库
到这一步的时候,第一台master数据库就不要继续操作了,避免会变动偏移量。
四. 从slave上操作
这里需要到第二台服务器上进行操作了,这里也进行主机名的修改,增加辨识度。
4.1 临时修改主机名
[root@localhost ~]# hostname slave22
[root@localhost ~]# bash
[root@slave22 ~]#
4.2 修改配置文件
从服务器只需要写上唯一ID即可,server-id=22,这个id内容并不一定要和这上面的一样,只要不与上一台的id号一样,咋设置都行。
#mysql的配置文件
[root@slave22 ~]# vim /etc/my.cnf
[root@slave22 ~]# sed 4,+1p -n /etc/my.cnf
[mysqld]
server-id=22
[root@slave22 ~]# systemctl restart mysqld
千万不要忘记需要重启服务
4.3 绑定主master服务器
[root@slave22 ~]# mysql -uroot -p
Enter password:
Welcome to the MySQL monitor.  Commands end with ; or \g.
Your MySQL connection id is 9
Server version: 8.0.32 MySQL Community Server - GPL

Copyright (c) 2000, 2023, Oracle and/or its affiliates.

Oracle is a registered trademark of Oracle Corporation and/or its
affiliates. Other names may be trademarks of their respective
owners.

Type 'help;' or '\h' for help. Type '\c' to clear the current input statement.

mysql> change master to master_host='192.168.116.166',master_user='slave21',master_password='#slvae21!@3LL',master_log_file='mysql-bin.000001',master_log_pos=157;
Query OK, 0 rows affected, 8 warnings (0.01 sec)

mysql> start slave;
Query OK, 0 rows affected, 1 warning (0.01 sec)

mysql> show slave status \G
*************************** 1. row ***************************
               Slave_IO_State: Waiting for source to send event
                  Master_Host: 192.168.116.166
                  Master_User: slave21
                  Master_Port: 3306
                Connect_Retry: 60
              Master_Log_File: mysql-bin.000001
          Read_Master_Log_Pos: 157
               Relay_Log_File: localhost-relay-bin.000002
                Relay_Log_Pos: 326
        Relay_Master_Log_File: mysql-bin.000001
             Slave_IO_Running: Yes
            Slave_SQL_Running: Yes
              Replicate_Do_DB:
          Replicate_Ignore_DB:
           Replicate_Do_Table:
       Replicate_Ignore_Table:
      Replicate_Wild_Do_Table:
  Replicate_Wild_Ignore_Table:
                   Last_Errno: 0
                   Last_Error:
                 Skip_Counter: 0
          Exec_Master_Log_Pos: 157
              Relay_Log_Space: 540
              Until_Condition: None
               Until_Log_File:
                Until_Log_Pos: 0
           Master_SSL_Allowed: No
           Master_SSL_CA_File:
           Master_SSL_CA_Path:
              Master_SSL_Cert:
            Master_SSL_Cipher:
               Master_SSL_Key:
        Seconds_Behind_Master: 0
Master_SSL_Verify_Server_Cert: No
                Last_IO_Errno: 0
                Last_IO_Error:
               Last_SQL_Errno: 0
               Last_SQL_Error:
  Replicate_Ignore_Server_Ids:
             Master_Server_Id: 21
                  Master_UUID: 7d57e7f4-c945-11ed-b2a1-000c29b5625a
             Master_Info_File: mysql.slave_master_info
                    SQL_Delay: 0
          SQL_Remaining_Delay: NULL
      Slave_SQL_Running_State: Replica has read all relay log; waiting for more updates
           Master_Retry_Count: 86400
                  Master_Bind:
      Last_IO_Error_Timestamp:
     Last_SQL_Error_Timestamp:
               Master_SSL_Crl:
           Master_SSL_Crlpath:
           Retrieved_Gtid_Set:
            Executed_Gtid_Set:
                Auto_Position: 0
         Replicate_Rewrite_DB:
                 Channel_Name:
           Master_TLS_Version:
       Master_public_key_path:
        Get_master_public_key: 0
            Network_Namespace:
1 row in set, 1 warning (0.00 sec)
实际需要执行的语句;
change master to master_host='192.168.116.166',master_user='slave21',master_password='#slvae21!@3LL',master_log_file='mysql-bin.000001',master_log_pos=157;
- master_host= #后面要填写第一台主master的IP
- master_user= #写之前在主master上创建的用户名
- master_password= #写之前在主master上创建的用户名的密码
- master_log_file= #日志文件,在master使用show master status;那一步显示的值。
- master_log_pos= #偏移量
start slave;
开启同步复制数据
show slave status \G
执行这一条语句后,看Slave_IO_Running: Yes 、Slave_SQL_Running: Yes这两个值是否为yes,为yes表示正在进行同步,也表示着我们这次的实验是成功的。
当然也有小伙伴做完之后这两个值不为yes,可能会出现有一个值为no,或者两个值都为no的情况。
4.4 出现no该如何解决
可以先将slave停了,重新再定义一遍,直到两个都为yes即可。
mysql> stop slave;
Query OK, 0 rows affected, 1 warning (0.00 sec)

mysql> reset slave;
Query OK, 0 rows affected, 1 warning (0.01 sec)

mysql> start slave;
Query OK, 0 rows affected, 1 warning (0.03 sec)
mysql> show slave status \G
*************************** 1. row ***************************
               Slave_IO_State: Waiting for source to send event
                  Master_Host: 192.168.116.166
                  Master_User: slave21
                  Master_Port: 3306
                Connect_Retry: 60
              Master_Log_File: mysql-bin.000001
          Read_Master_Log_Pos: 157
               Relay_Log_File: localhost-relay-bin.000003
                Relay_Log_Pos: 373
        Relay_Master_Log_File: mysql-bin.000001
             Slave_IO_Running: Yes
            Slave_SQL_Running: Yes
              Replicate_Do_DB:
          Replicate_Ignore_DB:
           Replicate_Do_Table:
       Replicate_Ignore_Table:
      Replicate_Wild_Do_Table:
  Replicate_Wild_Ignore_Table:
                   Last_Errno: 0
                   Last_Error:
                 Skip_Counter: 0
          Exec_Master_Log_Pos: 157
              Relay_Log_Space: 767
              Until_Condition: None
               Until_Log_File:
                Until_Log_Pos: 0
           Master_SSL_Allowed: No
           Master_SSL_CA_File:
           Master_SSL_CA_Path:
              Master_SSL_Cert:
            Master_SSL_Cipher:
               Master_SSL_Key:
        Seconds_Behind_Master: 0
Master_SSL_Verify_Server_Cert: No
                Last_IO_Errno: 0
                Last_IO_Error:
               Last_SQL_Errno: 0
               Last_SQL_Error:
  Replicate_Ignore_Server_Ids:
             Master_Server_Id: 21
                  Master_UUID: 7d57e7f4-c945-11ed-b2a1-000c29b5625a
             Master_Info_File: mysql.slave_master_info
                    SQL_Delay: 0
          SQL_Remaining_Delay: NULL
      Slave_SQL_Running_State: Replica has read all relay log; waiting for more updates
           Master_Retry_Count: 86400
                  Master_Bind:
      Last_IO_Error_Timestamp:
     Last_SQL_Error_Timestamp:
               Master_SSL_Crl:
           Master_SSL_Crlpath:
           Retrieved_Gtid_Set:
            Executed_Gtid_Set:
                Auto_Position: 0
         Replicate_Rewrite_DB:
                 Channel_Name:
           Master_TLS_Version:
       Master_public_key_path:
        Get_master_public_key: 0
            Network_Namespace:
1 row in set, 1 warning (0.00 sec)
也可以将要同步的数据库的内容,先拷贝一份过去从服务器上,让两台服务器要同步的数据库内容完全一样,这时在重新使用这个方式进行绑定,启动。
五. 测试结果
5.1 在主master上创建数据库
以上的实验我们就做完了,是时候开始创建数据库来验证了,我们之前选择同步的数据库是test那么我们就创建test数据库,并在其中写入表、数据等内容。
#主master上创建
mysql> create database test;
Query OK, 1 row affected (0.01 sec)

mysql> create database abc;
Query OK, 1 row affected (0.00 sec)

mysql> use test
Database changed
mysql> create table test1(id int,name varchar(20) not null default 'username');
Query OK, 0 rows affected (0.00 sec)

mysql> insert into test1 values(1,'zhangsan'), (2,'lisi'), (3,'wangwu');
Query OK, 3 rows affected (0.02 sec)
Records: 3  Duplicates: 0  Warnings: 0

mysql> desc test1;
+-------+-------------+------+-----+----------+-------+
| Field | Type        | Null | Key | Default  | Extra |
+-------+-------------+------+-----+----------+-------+
| id    | int         | YES  |     | NULL     |       |
| name  | varchar(20) | NO   |     | username |       |
+-------+-------------+------+-----+----------+-------+
2 rows in set (0.01 sec)

mysql> select id,name from test1;
+------+----------+
| id   | name     |
+------+----------+
|    1 | zhangsan |
|    2 | lisi     |
|    3 | wangwu   |
+------+----------+
3 rows in set (0.00 sec)
5.2 在slave从数据库上查看
可以看到test数据库已经同步过来了,进入到test库中查看其下的数据,一样是同步上了。
mysql> show databases;
+--------------------+
| Database           |
+--------------------+
| information_schema |
| mysql              |
| performance_schema |
| sys                |
| test               |
+--------------------+
5 rows in set (0.00 sec)

mysql> use test;
Reading table information for completion of table and column names
You can turn off this feature to get a quicker startup with -A

Database changed
mysql> show tables;
+----------------+
| Tables_in_test |
+----------------+
| test1          |
+----------------+
1 row in set (0.00 sec)

mysql> desc test1;
+-------+-------------+------+-----+----------+-------+
| Field | Type        | Null | Key | Default  | Extra |
+-------+-------------+------+-----+----------+-------+
| id    | int         | YES  |     | NULL     |       |
| name  | varchar(20) | NO   |     | username |       |
+-------+-------------+------+-----+----------+-------+
2 rows in set (0.00 sec)

mysql> select id,name from test1;
+------+----------+
| id   | name     |
+------+----------+
|    1 | zhangsan |
|    2 | lisi     |
|    3 | wangwu   |
+------+----------+
3 rows in set (0.00 sec)
查看数据库中的表的信息都存在,说明选择同步的test数据库没问题。
总结
以上的这个实验做下来会发现,只能从数据库同步主数据库,那么能否在这个基础上,让它们两都可以互相同步呢,答案是可以的,这个方式即为主主同步,两个都为主服务器,它同步数据的时候是从,写入数据的时候是主,下一篇来揭晓。若觉得以上内容还行的,可以点赞支持一下!