首先我们先明确几个概念。何谓brpc,bthread,协程。
- brpc
百度内最常使用的工业级RPC框架,RPC把网络交互类比为“client端访问server端上的函数”:client向server发送request后开始等待,知道server收到请求后,处理、回复client,client又再度恢复并根据response做出反应。 - bthread
bthread是brpc开发的一套协程,可以通俗的理解为轻量级的线程。 - 协程
协程是单线程下的并发,又称微线程,纤程。它是实现多任务的另一种方式,只不过是比线程更小的执行单元。因为它自带CPU的上下文,这样只要在合适的时机,我们可以把一个协程切换到另一个协程。
正如标题所说,brpc的精华全部都在bthread上,而bthread就是我们brpc开发的一套“协程”。而进程,线程,和bthread的关系是什么样的呢?一个进程里面可以开辟多个线程,而线程和协程的关系呢。在微信开源的libco上,线程 :协程 = 1 :N。而在bthread上 线程 :协程 = M :N,而bthread实现的关键就是工作窃取算法。后续会展开描述。
bthread有三大件:
- TaskControl(进程内唯一)
- TaskGroup(线程内唯一)
- TaskMeta(bthread上下文)
由于函数量巨大,所以我绘制了一张函数总体思路总结表,供大家方便理解。
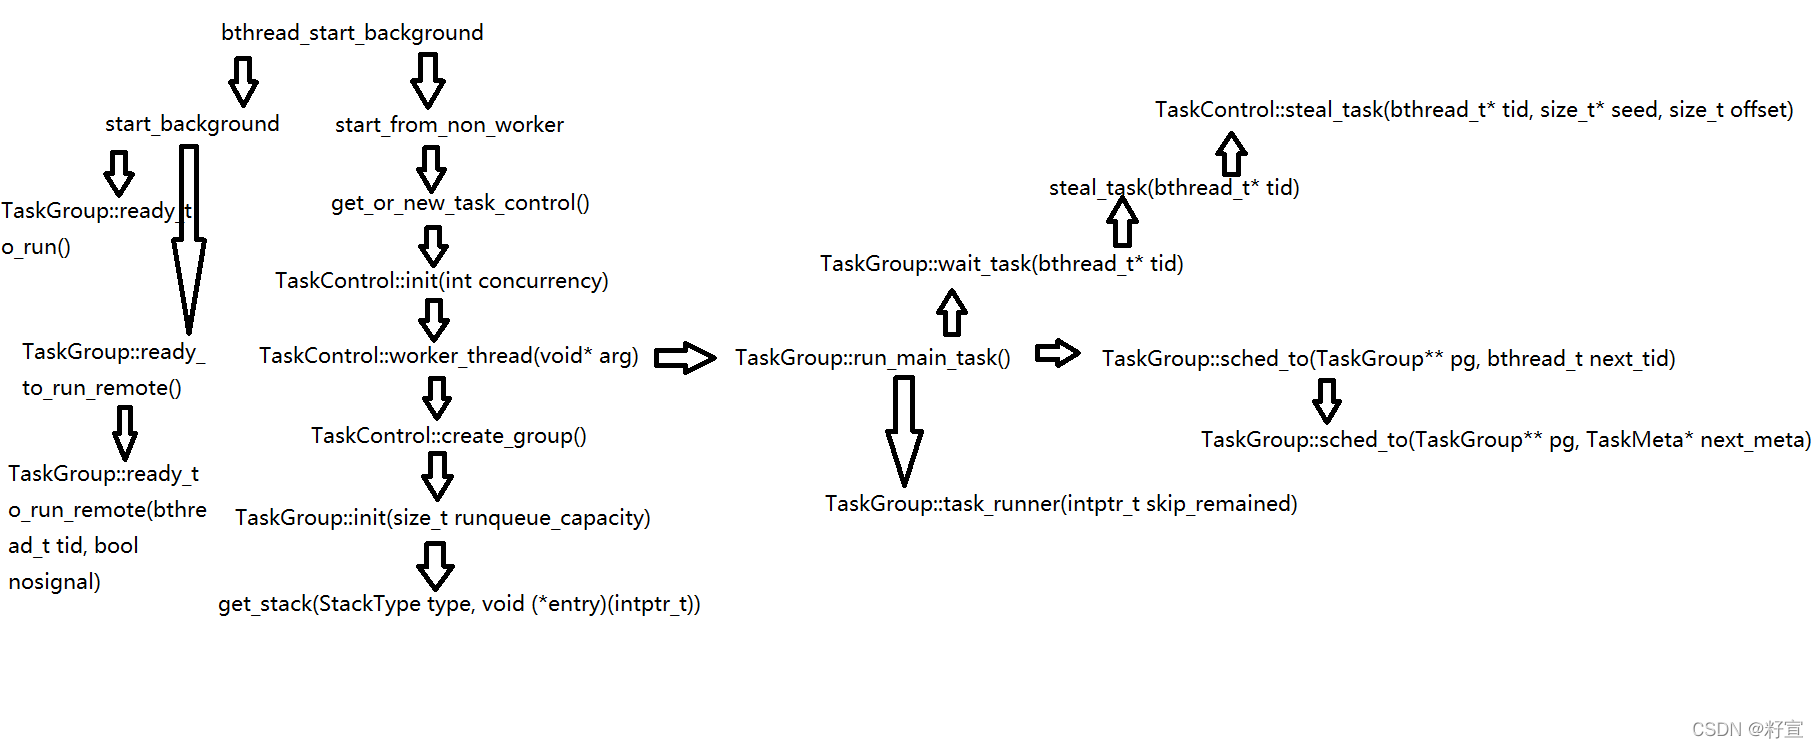
我们从创建函数开始讲起,并且以展开的方式依次对一些我能理解的地方进行剖析。首先我们介绍的是bthread创建函数。
bthread创建函数
好的 下面我一一讲解这两个bthread创建函数。
首先我们会去尝试获取到bthread的tls_task_group,而我们查看tls_task_group的定义处可以看到
__thread TaskGroup* tls_task_group = NULL; 那就证明如果没有tls_task_group的话则需要执行到return中的语句start_from_non_worker(),接下来我们查看到这个函数的定义。
//其一
int bthread_start_background(bthread_t* __restrict tid,
                             const bthread_attr_t* __restrict attr,
                             void * (*fn)(void*),
                             void* __restrict arg) {

    bthread::TaskGroup* g = bthread::tls_task_group;
    if (g) {

        // start from worker
        return g->start_background<false>(tid, attr, fn, arg);
    }
    return bthread::start_from_non_worker(tid, attr, fn, arg);
}

//其二
int bthread_start_urgent(bthread_t* __restrict tid,
                         const bthread_attr_t* __restrict attr,
                         void * (*fn)(void*),
                         void* __restrict arg) {

    bthread::TaskGroup* g = bthread::tls_task_group;
    if (g) {

        // start from worker
        return bthread::TaskGroup::start_foreground(&g, tid, attr, fn, arg);
    }
    return bthread::start_from_non_worker(tid, attr, fn, arg);
}
start_from_non_worker
这个函数一开始,我们会进行对TaskControl的获取或者新建TaskControl,也就是函数get_or_new_task_control()。
start_from_non_worker(bthread_t* __restrict tid,
                      const bthread_attr_t* __restrict attr,
                      void * (*fn)(void*),
                      void* __restrict arg) {

    TaskControl* c = get_or_new_task_control();
    if (NULL == c) {

        return ENOMEM;
    }
    if (attr != NULL && (attr->flags & BTHREAD_NOSIGNAL)) {

        // Remember the TaskGroup to insert NOSIGNAL tasks for 2 reasons:
        // 1. NOSIGNAL is often for creating many bthreads in batch,
        //    inserting into the same TaskGroup maximizes the batch.
        // 2. bthread_flush() needs to know which TaskGroup to flush.
        TaskGroup* g = tls_task_group_nosignal;
        if (NULL == g) {

            g = c->choose_one_group();
            tls_task_group_nosignal = g;
        }
        return g->start_background<true>(tid, attr, fn, arg);
    }
    return c->choose_one_group()->start_background<true>(
        tid, attr, fn, arg);
}
然后我们查看这个函数的定义:
get_or_new_task_control()
这个函数一开始先对全局变量TC(g_task_control)初始化原子变量,然后通过原子变量进行load,取出TC指针,如果不为空,直接返回。然后对竞争加上自旋锁,重复上一操作。如果加自旋锁也没有获取到TC指针,则说明TC指针确实为NULL,所以我们new一个TC指针,并且用并发度concurrency来初始化全局TC,最后蒋全局TC存入原子变量并返回。
inline TaskControl* get_or_new_task_control() {

    butil::atomic<TaskControl*>* p = (butil::atomic<TaskControl*>*)&g_task_control;
    TaskControl* c = p->load(butil::memory_order_consume);
    if (c != NULL) {

        return c;
    }
    BAIDU_SCOPED_LOCK(g_task_control_mutex);
    c = p->load(butil::memory_order_consume);
    if (c != NULL) {

        return c;
    }
    c = new (std::nothrow) TaskControl;
    if (NULL == c) {

        return NULL;
    }
    int concurrency = FLAGS_bthread_min_concurrency > 0 ?
        FLAGS_bthread_min_concurrency :
        FLAGS_bthread_concurrency;
    if (c->init(concurrency) != 0) {

        LOG(ERROR) << "Fail to init g_task_control";
        delete c;
        return NULL;
    }
    p->store(c, butil::memory_order_release);
    return c;
}
现在有同学就有疑问了,并发度指的是什么?我们先看TaskControl::init()的源码。
TaskControl::init
我们抛开不重要的东西,我们只看到for循环那里,我们可以看到TC的初始化,就是调用了pthread_create()去创建了concurrency个线程,而concurrency就是我们之前提到的并发度,而我之前提到的线程:协程 = N:M在这里就开始展露头角了。
int TaskControl::init(int concurrency) {

    if (_concurrency != 0) {

        LOG(ERROR) << "Already initialized";
        return -1;
    }
    if (concurrency <= 0) {

        LOG(ERROR) << "Invalid concurrency=" << concurrency;
        return -1;
    }
    _concurrency = concurrency;

    // Make sure TimerThread is ready.
    if (get_or_create_global_timer_thread() == NULL) {

        LOG(ERROR) << "Fail to get global_timer_thread";
        return -1;
    }

    _workers.resize(_concurrency);
    for (int i = 0; i < _concurrency; ++i) {

        const int rc = pthread_create(&_workers[i], NULL, worker_thread, this);
        if (rc) {

            LOG(ERROR) << "Fail to create _workers[" << i << "], " << berror(rc);
            return -1;
        }
    }
    _worker_usage_second.expose("bthread_worker_usage");
    _switch_per_second.expose("bthread_switch_second");
    _signal_per_second.expose("bthread_signal_second");
    _status.expose("bthread_group_status");

    // Wait for at least one group is added so that choose_one_group()
    // never returns NULL.
    // TODO: Handle the case that worker quits before add_group
    while (_ngroup == 0) {

        usleep(100);  // TODO: Elaborate
    }
    return 0;
}
在这里我们可以看到每个线程有一个回调函数worker_thread,下面我们看到这个回调函数的源码。
TaskControl::worker_thread
首先我们先获取一个TC的指针,然后用create_group创建一个TG,然后初始化tls_task_group,并且把_nworkers加一,然后运行主任务run_main_task,注意了,这里是一个死循环,如果推出了一些死循环,就输出一些日志,并且进行清理工作。
void* TaskControl::worker_thread(void* arg) {

    run_worker_startfn();
#ifdef BAIDU_INTERNAL
    logging::ComlogInitializer comlog_initializer;
#endif

    TaskControl* c = static_cast<TaskControl*>(arg);
    TaskGroup* g = c->create_group();
    TaskStatistics stat;
    if (NULL == g) {

        LOG(ERROR) << "Fail to create TaskGroup in pthread=" << pthread_self();
        return NULL;
    }
    BT_VLOG << "Created worker=" << pthread_self()
            << " bthread=" << g->main_tid();

    tls_task_group = g;
    c->_nworkers << 1;
    g->run_main_task();

    stat = g->main_stat();
    BT_VLOG << "Destroying worker=" << pthread_self() << " bthread="
            << g->main_tid() << " idle=" << stat.cputime_ns / 1000000.0
            << "ms uptime=" << g->current_uptime_ns() / 1000000.0 << "ms";
    tls_task_group = NULL;
    g->destroy_self();
    c->_nworkers << -1;
    return NULL;
}
好的,这里我们先对create_group和run_main_task的源码进行分析一下。
TaskControl::create_group()
这里我们先创建了一个TG,然后用TaskGroup::init进行初始化大小。然后用_add_group判断非工作线程,如果是则delete,这里我们先看到TaskGroup::init函数。
TaskGroup* TaskControl::create_group() {

    TaskGroup* g = new (std::nothrow) TaskGroup(this);
    if (NULL == g) {

        LOG(FATAL) << "Fail to new TaskGroup";
        return NULL;
    }
    if (g->init(FLAGS_task_group_runqueue_capacity) != 0) {

        LOG(ERROR) << "Fail to init TaskGroup";
        delete g;
        return NULL;
    }
    if (_add_group(g) != 0) {

        delete g;
        return NULL;
    }
    return g;
}
TaskGroup::init
这里我们可以看到这个函数用runqueue_capacity来控制这rq和remote_rq队列的大小。而这个数值的默认值为4096,然后进行get_stack()操作。进行完get_stack()操作之后,然后建立资源池slot,然后从资源池中获取TM。
int TaskGroup::init(size_t runqueue_capacity) {

    if (_rq.init(runqueue_capacity) != 0) {

        LOG(FATAL) << "Fail to init _rq";
        return -1;
    }
    if (_remote_rq.init(runqueue_capacity / 2) != 0) {

        LOG(FATAL) << "Fail to init _remote_rq";
        return -1;
    }
    ContextualStack* stk = get_stack(STACK_TYPE_MAIN, NULL);
    if (NULL == stk) {

        LOG(FATAL) << "Fail to get main stack container";
        return -1;
    }
    butil::ResourceId<TaskMeta> slot;
    TaskMeta* m = butil::get_resource<TaskMeta>(&slot);
    if (NULL == m) {

        LOG(FATAL) << "Fail to get TaskMeta";
        return -1;
    }
    m->stop = false;
    m->interrupted = false;
    m->about_to_quit = false;
    m->fn = NULL;
    m->arg = NULL;
    m->local_storage = LOCAL_STORAGE_INIT;
    m->cpuwide_start_ns = butil::cpuwide_time_ns();
    m->stat = EMPTY_STAT;
    m->attr = BTHREAD_ATTR_TASKGROUP;
    m->tid = make_tid(*m->version_butex, slot);
    m->set_stack(stk);

    _cur_meta = m;
    _main_tid = m->tid;
    _main_stack = stk;
    _last_run_ns = butil::cpuwide_time_ns();
    return 0;
}
get_stack
这是get_stack()的源码,这个函数里面只有一个switch操作,有四个栈类型选项。分别是:
| 栈名 | 栈大小 |
|---|---|
| STACK_TYPE_SMALL | 32k(32768) |
| STACK_TYPE_NORMAL | 1M(1048576) |
| STACK_TYPE_LARGE | 8M(8388608) |
还有一个是STACK_TYPE_MAIN
前三个都归为一类,是StackFactory的通用模板,而最后一个另起一类,是其的特例化模板。
inline ContextualStack* get_stack(StackType type, void (*entry)(intptr_t)) {

    switch (type) {

    case STACK_TYPE_PTHREAD:
        return NULL;
    case STACK_TYPE_SMALL:
        return StackFactory<SmallStackClass>::get_stack(entry);
    case STACK_TYPE_NORMAL:
        return StackFactory<NormalStackClass>::get_stack(entry);
    case STACK_TYPE_LARGE:
        return StackFactory<LargeStackClass>::get_stack(entry);
    case STACK_TYPE_MAIN:
        return StackFactory<MainStackClass>::get_stack(entry);
    }
    return NULL;
}
首先我们看到通用模板的定义:
template <typename StackClass> struct StackFactory {

    struct Wrapper : public ContextualStack {

        explicit Wrapper(void (*entry)(intptr_t)) {

            if (allocate_stack_storage(&storage, *StackClass::stack_size_flag,
                                       FLAGS_guard_page_size) != 0) {

                storage.zeroize();
                context = NULL;
                return;
            }
            context = bthread_make_fcontext(storage.bottom, storage.stacksize, entry);
            stacktype = (StackType)StackClass::stacktype;
        }
        ~Wrapper() {

            if (context) {

                context = NULL;
                deallocate_stack_storage(&storage);
                storage.zeroize();
            }
        }
    };

    static ContextualStack* get_stack(void (*entry)(intptr_t)) {

        return butil::get_object<Wrapper>(entry);
    }

    static void return_stack(ContextualStack* sc) {

        butil::return_object(static_cast<Wrapper*>(sc));
    }
};
这是StackFactory的通用模板,我们可以发现两个函数和一个内部类Wapper。这两个函数一个是获取栈,一个是归还栈,这两个操作是互逆的。这个内部类的bthread_make_fcontext函数会对其三个变量进行初始化,而这三个变量都是ContextualStack的成员。
struct ContextualStack {

    bthread_fcontext_t context;
    StackType stacktype;
    StackStorage storage;
};
说完了通用模板,我们来说一下特例化模板。
template <> struct StackFactory<MainStackClass> {

    static ContextualStack* get_stack(void (*)(intptr_t)) {

        ContextualStack* s = new (std::nothrow) ContextualStack;
        if (NULL == s) {

            return NULL;
        }
        s->context = NULL;
        s->stacktype = STACK_TYPE_MAIN;
        s->storage.zeroize();
        return s;
    }

    static void return_stack(ContextualStack* s) {

        delete s;
    }
};
特例化模板的代码量比通用模板的代码量要少,那么说明特例化模板的思路更加简单啦。因为特例化没有Wapper,也就没有调用那个分配上下文的函数bthread_make_fcontext()。
TaskGroup::run_main_task()
void TaskGroup::run_main_task() {

    bvar::PassiveStatus<double> cumulated_cputime(
        get_cumulated_cputime_from_this, this);
    std::unique_ptr<bvar::PerSecond<bvar::PassiveStatus<double> > > usage_bvar;

    TaskGroup* dummy = this;
    bthread_t tid;
    while (wait_task(&tid)) {

        TaskGroup::sched_to(&dummy, tid);
        DCHECK_EQ(this, dummy);
        DCHECK_EQ(_cur_meta->stack, _main_stack);
        if (_cur_meta->tid != _main_tid) {

            TaskGroup::task_runner(1/*skip remained*/);
        }
        if (FLAGS_show_per_worker_usage_in_vars && !usage_bvar) {

            char name[32];
#if defined(OS_MACOSX)
            snprintf(name, sizeof(name), "bthread_worker_usage_%" PRIu64,
                     pthread_numeric_id());
#else
            snprintf(name, sizeof(name), "bthread_worker_usage_%ld",
                     (long)syscall(SYS_gettid));
#endif
            usage_bvar.reset(new bvar::PerSecond<bvar::PassiveStatus<double> >
                             (name, &cumulated_cputime, 1));
        }
    }
    // Don't forget to add elapse of last wait_task.
    current_task()->stat.cputime_ns += butil::cpuwide_time_ns() - _last_run_ns;
}
run_main_task的三大关键函数。
- wait_task(等)
wait_task就是等待找到任务,而这里就会涉及到工作窃取。下面我们先去看一下wait_task的源代码,看看究竟是怎么做到工作窃取的。
run_main_task
bool TaskGroup::wait_task(bthread_t* tid) {

    do {

#ifndef BTHREAD_DONT_SAVE_PARKING_STATE
        if (_last_pl_state.stopped()) {

            return false;
        }
        _pl->wait(_last_pl_state);
        if (steal_task(tid)) {

            return true;
        }
    } while (true);
}
这里我们先看到_last_pl_state和stopped()两个新颖的东西,我们先看到一下stopped的源码。
class BAIDU_CACHELINE_ALIGNMENT ParkingLot {

public:
    class State {

    public:
        State(): val(0) {
  }
        bool stopped() const {
   return val & 1; }
    private:
    friend class ParkingLot;
        State(int val) : val(val) {
  }
        int val;
    };

    ParkingLot() : _pending_signal(0) {
  }

    // Wake up at most `num_task' workers.
    // Returns #workers woken up.
    int signal(int num_task) {

        _pending_signal.fetch_add((num_task << 1), butil::memory_order_release);
        return futex_wake_private(&_pending_signal, num_task);
    }

    // Get a state for later wait().
    State get_state() {

        return _pending_signal.load(butil::memory_order_acquire);
    }

    // Wait for tasks.
    // If the `expected_state' does not match, wait() may finish directly.
    void wait(const State& expected_state) {

        futex_wait_private(&_pending_signal, expected_state.val, NULL);
    }

    // Wakeup suspended wait() and make them unwaitable ever.
    void stop() {

        _pending_signal.fetch_or(1);
        futex_wake_private(&_pending_signal, 10000);
    }
private:
    // higher 31 bits for signalling, LSB for stopping.
    butil::atomic<int> _pending_signal;
};
好的,看stopped的源码直接给我揪出了一个类,那我们就不避免的去了解一下这个类了。这个类里面有一个内部类State,Parkinglot是它的友元。我们先看一下它的成员函数signal,唤醒最多num_task<<1个worker,这个位操作世纪就是把num_task乘了2。接着调用了futex_wake_private。而这个函数的源码为:
inline int futex_wait_private(
    void* addr1, int expected, const timespec* timeout) {

    return syscall(SYS_futex, addr1, (FUTEX_WAIT | FUTEX_PRIVATE_FLAG),
                   expected, timeout, NULL, 0);
}
这个函数只有一条语句,就是return语句。之所以要这样做,其实就是对于系统调用SYS_futex的封装。
然后我们回到wait_task函数,wait函数就是阻塞等待通知,被通知后执行steal_task()函数。
steal_task
首先是_remote_rq队列中的任务出队,如果没有则全局TC来窃取任务。
bool steal_task(bthread_t* tid) {

        if (_remote_rq.pop(tid)) {

            return true;
        }
#ifndef BTHREAD_DONT_SAVE_PARKING_STATE
        _last_pl_state = _pl->get_state();
#endif
        return _control->steal_task(tid, &_steal_seed, _steal_offset);
    }
调用到的TaskControl::steal_task()源码如下:
TaskControl::steal_task
先随机找一个TG,先从它的rq队列窃取任务,如果失败则从remote_rq队列窃取任务。所以说,rq比remote_rq的优先级更高。这里疑问就来了,为啥是这么个顺序?这里是为了避免资源竞态,避免多个TG等待任务的时候,当前TG从rq中取任务,与其他TG过来自己这边窃取任务造成竞态。
bool TaskControl::steal_task(bthread_t* tid, size_t* seed, size_t offset) {

    // 1: Acquiring fence is paired with releasing fence in _add_group to
    // avoid accessing uninitialized slot of _groups.
    const size_t ngroup = _ngroup.load(butil::memory_order_acquire/*1*/);
    if (0 == ngroup) {

        return false;
    }

    // NOTE: Don't return inside `for' iteration since we need to update |seed|
    bool stolen = false;
    size_t s = *seed;
    for (size_t i = 0; i < ngroup; ++i, s += offset) {

        TaskGroup* g = _groups[s % ngroup];
        // g is possibly NULL because of concurrent _destroy_group
        if (g) {

            if (g->_rq.steal(tid)) {

                stolen = true;
                break;
            }
            if (g->_remote_rq.pop(tid)) {

                stolen = true;
                break;
            }
        }
    }
    *seed = s;
    return stolen;
}
TaskGroup::sched_to
- sched_to(切换栈)
首先先通过传入的参数next_tid找到TM,next_meta,和对应的ContextualStack信息:stk。然后给next_meta设置栈stk。然后调用重载的sched_to函数。
inline void TaskGroup::sched_to(TaskGroup** pg, bthread_t next_tid) {

    TaskMeta* next_meta = address_meta(next_tid);
    if (next_meta->stack == NULL) {

        ContextualStack* stk = get_stack(next_meta->stack_type(), task_runner);
        if (stk) {

            next_meta->set_stack(stk);
        } else {

            // stack_type is BTHREAD_STACKTYPE_PTHREAD or out of memory,
            // In latter case, attr is forced to be BTHREAD_STACKTYPE_PTHREAD.
            // This basically means that if we can't allocate stack, run
            // the task in pthread directly.
            next_meta->attr.stack_type = BTHREAD_STACKTYPE_PTHREAD;
            next_meta->set_stack((*pg)->_main_stack);
        }
    }
    // Update now_ns only when wait_task did yield.
    sched_to(pg, next_meta);
}
TaskGroup::sched_to
显示记录一些数据,判断下一个TM和当前TM是否相等,如果不相等,则去切换栈。tls_bls是当前TM的局部存储,先做还原,然后赋值成下一个TM的局部存储,然后jump_stack()去切换栈。至于jump_stack()涉及到汇编知识,而我不太擅长,就不展开讲了。
void TaskGroup::sched_to(TaskGroup** pg, TaskMeta* next_meta) {

    TaskGroup* g = *pg;
#ifndef NDEBUG
    if ((++g->_sched_recursive_guard) > 1) {

        LOG(FATAL) << "Recursively(" << g->_sched_recursive_guard - 1
                   << ") call sched_to(" << g << ")";
    }
#endif
    // Save errno so that errno is bthread-specific.
    const int saved_errno = errno;
    void* saved_unique_user_ptr = tls_unique_user_ptr;

    TaskMeta* const cur_meta = g->_cur_meta;
    const int64_t now = butil::cpuwide_time_ns();
    const int64_t elp_ns = now - g->_last_run_ns;
    g->_last_run_ns = now;
    cur_meta->stat.cputime_ns += elp_ns;
    if (cur_meta->tid != g->main_tid()) {

        g->_cumulated_cputime_ns += elp_ns;
    }
    ++cur_meta->stat.nswitch;
    ++ g->_nswitch;
    // Switch to the task
    if (__builtin_expect(next_meta != cur_meta, 1)) {

        g->_cur_meta = next_meta;
        // Switch tls_bls
        cur_meta->local_storage = tls_bls;
        tls_bls = next_meta->local_storage;

        // Logging must be done after switching the local storage, since the logging lib
        // use bthread local storage internally, or will cause memory leak.
        if ((cur_meta->attr.flags & BTHREAD_LOG_CONTEXT_SWITCH) ||
            (next_meta->attr.flags & BTHREAD_LOG_CONTEXT_SWITCH)) {

            LOG(INFO) << "Switch bthread: " << cur_meta->tid << " -> "
                      << next_meta->tid;
        }

        if (cur_meta->stack != NULL) {

            if (next_meta->stack != cur_meta->stack) {

                jump_stack(cur_meta->stack, next_meta->stack);
                // probably went to another group, need to assign g again.
                g = tls_task_group;
            }
#ifndef NDEBUG
            else {

                // else pthread_task is switching to another pthread_task, sc
                // can only equal when they're both _main_stack
                CHECK(cur_meta->stack == g->_main_stack);
            }
#endif
        }
        // else because of ending_sched(including pthread_task->pthread_task)
    } else {

        LOG(FATAL) << "bthread=" << g->current_tid() << " sched_to itself!";
    }

    while (g->_last_context_remained) {

        RemainedFn fn = g->_last_context_remained;
        g->_last_context_remained = NULL;
        fn(g->_last_context_remained_arg);
        g = tls_task_group;
    }

    // Restore errno
    errno = saved_errno;
    tls_unique_user_ptr = saved_unique_user_ptr;

#ifndef NDEBUG
    --g->_sched_recursive_guard;
#endif
    *pg = g;
}
- task_runner(执行)
下面我们来看一下task_runner的源码
TaskGroup::task_runner
源码很长,由于task_runner的输入参数为1,则最上面的if逻辑语句会跳过。然后下面就是一个do-while循环,先执行回调函数,然后清理线程局部变量,累加版本号,唤醒join,_nbthreads减一。然后调用ending_sched()查找下一个任务。当tls_task_group ==main_tid时终止循环。
void TaskGroup::task_runner(intptr_t skip_remained) {

    // NOTE: tls_task_group is volatile since tasks are moved around
    //       different groups.
    TaskGroup* g = tls_task_group;

    if (!skip_remained) {

        while (g->_last_context_remained) {

            RemainedFn fn = g->_last_context_remained;
            g->_last_context_remained = NULL;
            fn(g->_last_context_remained_arg);
            g = tls_task_group;
        }

#ifndef NDEBUG
        --g->_sched_recursive_guard;
#endif
    }

    do {

        // A task can be stopped before it gets running, in which case
        // we may skip user function, but that may confuse user:
        // Most tasks have variables to remember running result of the task,
        // which is often initialized to values indicating success. If an
        // user function is never called, the variables will be unchanged
        // however they'd better reflect failures because the task is stopped
        // abnormally.

        // Meta and identifier of the task is persistent in this run.
        TaskMeta* const m = g->_cur_meta;

        if (FLAGS_show_bthread_creation_in_vars) {

            // NOTE: the thread triggering exposure of pending time may spend
            // considerable time because a single bvar::LatencyRecorder
            // contains many bvar.
            g->_control->exposed_pending_time() <<
                (butil::cpuwide_time_ns() - m->cpuwide_start_ns) / 1000L;
        }

        // Not catch exceptions except ExitException which is for implementing
        // bthread_exit(). User code is intended to crash when an exception is
        // not caught explicitly. This is consistent with other threading
        // libraries.
        void* thread_return;
        try {

            thread_return = m->fn(m->arg);
        } catch (ExitException& e) {

            thread_return = e.value();
        }

        // Group is probably changed
        g = tls_task_group;

        // TODO: Save thread_return
        (void)thread_return;

        // Logging must be done before returning the keytable, since the logging lib
        // use bthread local storage internally, or will cause memory leak.
        // FIXME: the time from quiting fn to here is not counted into cputime
        if (m->attr.flags & BTHREAD_LOG_START_AND_FINISH) {

            LOG(INFO) << "Finished bthread " << m->tid << ", cputime="
                      << m->stat.cputime_ns / 1000000.0 << "ms";
        }

        // Clean tls variables, must be done before changing version_butex
        // otherwise another thread just joined this thread may not see side
        // effects of destructing tls variables.
        KeyTable* kt = tls_bls.keytable;
        if (kt != NULL) {

            return_keytable(m->attr.keytable_pool, kt);
            // After deletion: tls may be set during deletion.
            tls_bls.keytable = NULL;
            m->local_storage.keytable = NULL; // optional
        }

        // Increase the version and wake up all joiners, if resulting version
        // is 0, change it to 1 to make bthread_t never be 0. Any access
        // or join to the bthread after changing version will be rejected.
        // The spinlock is for visibility of TaskGroup::get_attr.
        {

            BAIDU_SCOPED_LOCK(m->version_lock);
            if (0 == ++*m->version_butex) {

                ++*m->version_butex;
            }
        }
        butex_wake_except(m->version_butex, 0);

        g->_control->_nbthreads << -1;
        g->set_remained(TaskGroup::_release_last_context, m);
        ending_sched(&g);

    } while (g->_cur_meta->tid != g->_main_tid);

    // Was called from a pthread and we don't have BTHREAD_STACKTYPE_PTHREAD
    // tasks to run, quit for more tasks.
}
好的,现在我们讲解完了get_or_new_task_control()函数,我们继续往上一级看。然后会调用start_background< true >函数。由于在bthread_start_background中if(g)也使用了start_background函数,只是后面是true和false的差别。我们一起来看一看这个函数的源码。
TaskGroup::start_background
这个函数的前文就是对一些变量的初始化。而前面的true和false的判断就体现在最后的if语句中。如果是真,则运行的是ready_to_run_remote()
template <bool REMOTE>
int TaskGroup::start_background(bthread_t* __restrict th,
                                const bthread_attr_t* __restrict attr,
                                void * (*fn)(void*),
                                void* __restrict arg) {

    if (__builtin_expect(!fn, 0)) {

        return EINVAL;
    }
    const int64_t start_ns = butil::cpuwide_time_ns();
    const bthread_attr_t using_attr = (attr ? *attr : BTHREAD_ATTR_NORMAL);
    butil::ResourceId<TaskMeta> slot;
    TaskMeta* m = butil::get_resource(&slot);
    if (__builtin_expect(!m, 0)) {

        return ENOMEM;
    }
    CHECK(m->current_waiter.load(butil::memory_order_relaxed) == NULL);
    m->stop = false;
    m->interrupted = false;
    m->about_to_quit = false;
    m->fn = fn;
    m->arg = arg;
    CHECK(m->stack == NULL);
    m->attr = using_attr;
    m->local_storage = LOCAL_STORAGE_INIT;
    m->cpuwide_start_ns = start_ns;
    m->stat = EMPTY_STAT;
    m->tid = make_tid(*m->version_butex, slot);
    *th = m->tid;
    if (using_attr.flags & BTHREAD_LOG_START_AND_FINISH) {

        LOG(INFO) << "Started bthread " << m->tid;
    }
    _control->_nbthreads << 1;
    if (REMOTE) {

        ready_to_run_remote(m->tid, (using_attr.flags & BTHREAD_NOSIGNAL));
    } else {

        ready_to_run(m->tid, (using_attr.flags & BTHREAD_NOSIGNAL));
    }
    return 0;
}
TaskGroup::ready_to_run_remote
先给当前TG的remote_rq加互斥锁。然后入队,然后一个while循环,入队失败则休眠1ms,再继续入队。入队失败的原因只有一个,那就是队列容量已满。nosigner一般多为false,所以选择到一个else这里,最后调用了一个signal_task。
void TaskGroup::ready_to_run_remote(bthread_t tid, bool nosignal) {

    _remote_rq._mutex.lock();
    while (!_remote_rq.push_locked(tid)) {

        flush_nosignal_tasks_remote_locked(_remote_rq._mutex);
        LOG_EVERY_SECOND(ERROR) << "_remote_rq is full, capacity="
                                << _remote_rq.capacity();
        ::usleep(1000);
        _remote_rq._mutex.lock();
    }
    if (nosignal) {

        ++_remote_num_nosignal;
        _remote_rq._mutex.unlock();
    } else {

        const int additional_signal = _remote_num_nosignal;
        _remote_num_nosignal = 0;
        _remote_nsignaled += 1 + additional_signal;
        _remote_rq._mutex.unlock();
        _control->signal_task(1 + additional_signal);
    }
}
TaskControl::signal_task
num_task如果大于2,则重新赋值为2。因为如果num_task越大,消费得也就越快,但是如果一直消费,函数调用是阻塞的,这样bthread_start_background就不好生产任务,在这里也是达到了一种平衡。
void TaskControl::signal_task(int num_task) {

    if (num_task <= 0) {

        return;
    }
    // TODO(gejun): Current algorithm does not guarantee enough threads will
    // be created to match caller's requests. But in another side, there's also
    // many useless signalings according to current impl. Capping the concurrency
    // is a good balance between performance and timeliness of scheduling.
    if (num_task > 2) {

        num_task = 2;
    }
    int start_index = butil::fmix64(pthread_numeric_id()) % PARKING_LOT_NUM;
    num_task -= _pl[start_index].signal(1);
    if (num_task > 0) {

        for (int i = 1; i < PARKING_LOT_NUM && num_task > 0; ++i) {

            if (++start_index >= PARKING_LOT_NUM) {

                start_index = 0;
            }
            num_task -= _pl[start_index].signal(1);
        }
    }
    if (num_task > 0 &&
        FLAGS_bthread_min_concurrency > 0 &&    // test min_concurrency for performance
        _concurrency.load(butil::memory_order_relaxed) < FLAGS_bthread_concurrency) {

        // TODO: Reduce this lock
        BAIDU_SCOPED_LOCK(g_task_control_mutex);
        if (_concurrency.load(butil::memory_order_acquire) < FLAGS_bthread_concurrency) {

            add_workers(1);
        }
    }
}
而当为false时,则调用ready_ro_run。
TaskGroup::ready_to_run
而ready_to_run相较于ready_to_remote对比就简洁很多了。而这两个的区别就是ready_to_run()就是把任务入队到TG的 rq,ready_to_run_remote()是在当前线程不是brpc的worker()的时候(在worker外创建的 bthread任务),把任务通过TC入队到某个TG的 remote_rq。
void TaskGroup::ready_to_run(bthread_t tid, bool nosignal) {

    push_rq(tid);
    if (nosignal) {

        ++_num_nosignal;
    } else {

        const int additional_signal = _num_nosignal;
        _num_nosignal = 0;
        _nsignaled += 1 + additional_signal;
        _control->signal_task(1 + additional_signal);
    }
}
说了这么多了,回归到最初的两个新建函数,还一个新建函数是bthread_start_urgent。
bthread_start_urgent
大致是相同的,但我们会发现在存在TG的情况下,调用的函数会稍微有些区别。这里调用的是TaskGroup::start_foreground。
int bthread_start_urgent(bthread_t* __restrict tid,
                         const bthread_attr_t* __restrict attr,
                         void * (*fn)(void*),
                         void* __restrict arg) {

    bthread::TaskGroup* g = bthread::tls_task_group;
    if (g) {

        // start from worker
        return bthread::TaskGroup::start_foreground(&g, tid, attr, fn, arg);
    }
    return bthread::start_from_non_worker(tid, attr, fn, arg);
}
TaskGroup::start_foreground
我们可以通过源码观察到,其实这个新建bthread函数就是把运行一起承包了,当然,耗时也会有差别。我们在测试运行上可以看出来差距。
int TaskGroup::start_foreground(TaskGroup** pg,
                                bthread_t* __restrict th,
                                const bthread_attr_t* __restrict attr,
                                void * (*fn)(void*),
                                void* __restrict arg) {

    if (__builtin_expect(!fn, 0)) {

        return EINVAL;
    }
    const int64_t start_ns = butil::cpuwide_time_ns();
    const bthread_attr_t using_attr = (attr ? *attr : BTHREAD_ATTR_NORMAL);
    butil::ResourceId<TaskMeta> slot;
    TaskMeta* m = butil::get_resource(&slot);
    if (__builtin_expect(!m, 0)) {

        return ENOMEM;
    }
    CHECK(m->current_waiter.load(butil::memory_order_relaxed) == NULL);
    m->stop = false;
    m->interrupted = false;
    m->about_to_quit = false;
    m->fn = fn;
    m->arg = arg;
    CHECK(m->stack == NULL);
    m->attr = using_attr;
    m->local_storage = LOCAL_STORAGE_INIT;
    m->cpuwide_start_ns = start_ns;
    m->stat = EMPTY_STAT;
    m->tid = make_tid(*m->version_butex, slot);
    *th = m->tid;
    if (using_attr.flags & BTHREAD_LOG_START_AND_FINISH) {

        LOG(INFO) << "Started bthread " << m->tid;
    }

    TaskGroup* g = *pg;
    g->_control->_nbthreads << 1;
    if (g->is_current_pthread_task()) {

        // never create foreground task in pthread.
        g->ready_to_run(m->tid, (using_attr.flags & BTHREAD_NOSIGNAL));
    } else {

        // NOSIGNAL affects current task, not the new task.
        RemainedFn fn = NULL;
        if (g->current_task()->about_to_quit) {

            fn = ready_to_run_in_worker_ignoresignal;
        } else {

            fn = ready_to_run_in_worker;
        }
        ReadyToRunArgs args = {

            g->current_tid(),
            (bool)(using_attr.flags & BTHREAD_NOSIGNAL)
        };
        g->set_remained(fn, &args);
        TaskGroup::sched_to(pg, m->tid);
    }
    return 0;
}
在这里我们进行的测试是测试利用bthread_start_urgent和bthread_start_background的创建耗时对比。创建10000个样例然后进行除法测出两种方法创建bthread所需时间。
TEST_F(BthreadTest, start_latency_when_high_idle) {

    bool warmup = true;
    long elp1 = 0;
    long elp2 = 0;
    int REP = 0;
    for (int i = 0; i < 10000; ++i) {

        butil::Timer tm;
        tm.start();
        bthread_t th;
        bthread_start_urgent(&th, NULL, log_start_latency, &tm);
        bthread_join(th, NULL);
        bthread_t th2;
        butil::Timer tm2;
        tm2.start();
        bthread_start_background(&th2, NULL, log_start_latency, &tm2);
        bthread_join(th2, NULL);
        if (!warmup) {

            ++REP;
            elp1 += tm.n_elapsed();
            elp2 += tm2.n_elapsed();
        } else if (i == 100) {

            warmup = false;
        }
    }
    LOG(INFO) << "start_urgent=" << elp1 / REP << "ns start_background="
              << elp2 / REP << "ns";
}
这是一段测试代码,我们通过make然后脚本运行后观察数据。

发现bthread_start_background要比bthread_start_urgent耗时虽说差距不大,但是bthread_start_background还时要快一点。
以上就是我对bthread的理解了,有问题欢迎指出哦!