Scrapy作为爬虫的进阶内容,可以实现多线程爬取目标内容,简化代码逻辑,提高开发效率,深受爬虫开发者的喜爱,本文主要以爬取某股票网站为例,简述如何通过Scrapy实现爬虫,仅供学习分享使用,如有不足之处,还请指正。
什么是Scrapy?
Scrapy是用python实现的一个为了爬取网站数据,提取结构性数据而编写的应用框架。使用Twisted高效异步网络框架来处理网络通信。Scrapy架构:
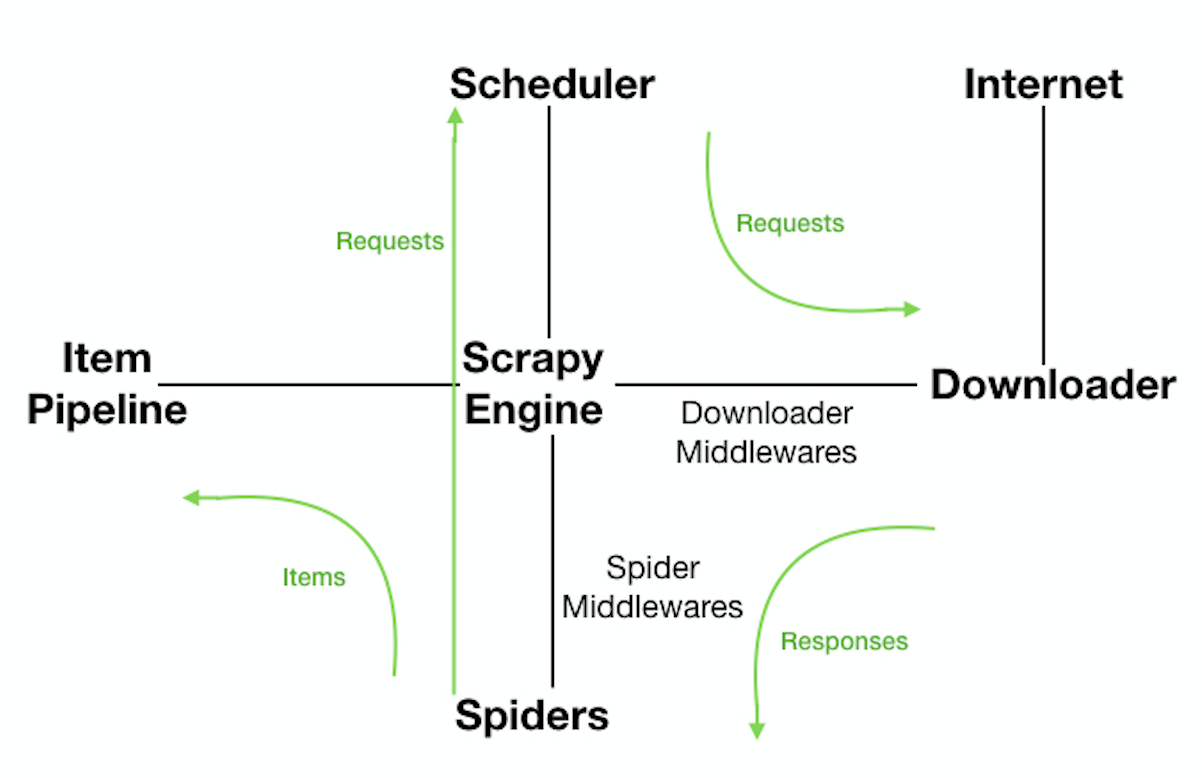
关于Scrapy架构各项说明,如下所示:
- ScrapyEngine:引擎。负责控制数据流在系统中所有组件中流动,并在相应动作发生时触发事件。 此组件相当于爬虫的“大脑”,是 整个爬虫的调度中心。
- Schedule:调度器。接收从引擎发过来的requests,并将他们入队。初始爬取url和后续在页面里爬到的待爬取url放入调度器中,等待被爬取。调度器会自动去掉重复的url。
- Downloader:下载器。负责获取页面数据,并提供给引擎,而后提供给spider。
- Spider:爬虫。用户编些用于分析response并提取item和额外跟进的url。将额外跟进的url提交给ScrapyEngine,加入到Schedule中。将每个spider负责处理一个特定(或 一些)网站。
- ItemPipeline:负责处理被spider提取出来的item。当页面被爬虫解析所需的数据存入Item后,将被发送到Pipeline,并经过设置好次序
- DownloaderMiddlewares:下载中间件。是在引擎和下载器之间的特定钩子(specific hook),处理它们之间的请求(request)和响应(response)。提供了一个简单的机制,通过插入自定义代码来扩展Scrapy功能。通过设置DownloaderMiddlewares来实现爬虫自动更换user-agent,IP等。
- SpiderMiddlewares:Spider中间件。是在引擎和Spider之间的特定钩子(specific hook),处理spider的输入(response)和输出(items或requests)。提供了同样简单机制,通过插入自定义代码来扩展Scrapy功能。
Scrapy数据流:
- ScrapyEngine打开一个网站,找到处理该网站的Spider,并向该Spider请求第一个(批)要爬取的url(s);
- ScrapyEngine向调度器请求第一个要爬取的url,并加入到Schedule作为请求以备调度;
- ScrapyEngine向调度器请求下一个要爬取的url;
- Schedule返回下一个要爬取的url给ScrapyEngine,ScrapyEngine通过DownloaderMiddlewares将url转发给Downloader;
- 页面下载完毕,Downloader生成一个页面的Response,通过DownloaderMiddlewares发送给ScrapyEngine;
- ScrapyEngine从Downloader中接收到Response,通过SpiderMiddlewares发送给Spider处理;
- Spider处理Response并返回提取到的Item以及新的Request给ScrapyEngine;
- ScrapyEngine将Spider返回的Item交给ItemPipeline,将Spider返回的Request交给Schedule进行从第二步开始的重复操作,直到调度器中没有待处理的Request,ScrapyEngine关闭。
Scrapy安装
在命令行模式下,通过pip install scrapy命令进行安装Scrapy,如下所示:
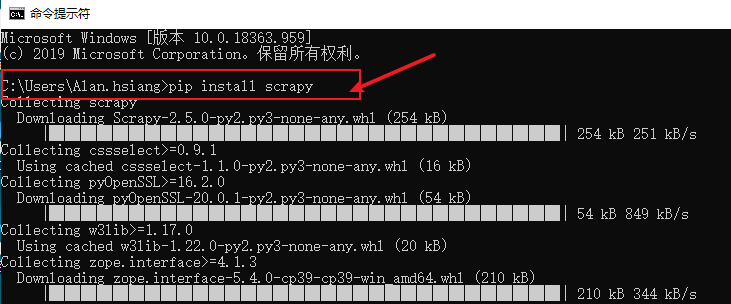
当出现以下提示信息时,表示安装成功

Scrapy创建项目
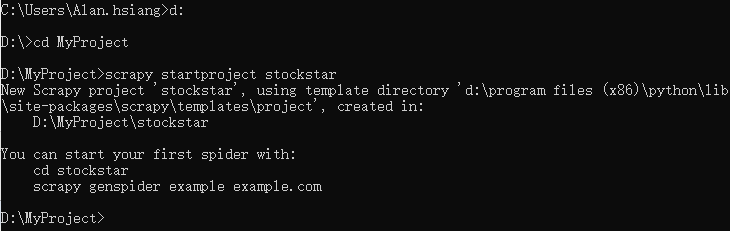
在命令行模式下,切换到项目存放目录,通过scrapy startproject stockstar 创建爬虫项目,如下所示:
根据提示,通过提供的模板,创建爬虫【命令格式:scrapy genspider 爬虫名称 域名】,如下所示:

注意:爬虫名称,不能跟项目名称一致,否则会报错,如下所示:

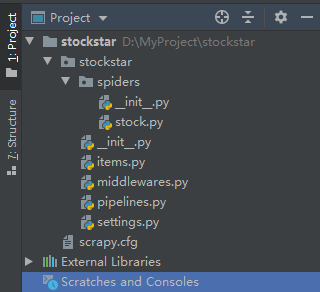
通过Pycharm打开新创建的scrapy项目,如下所示:
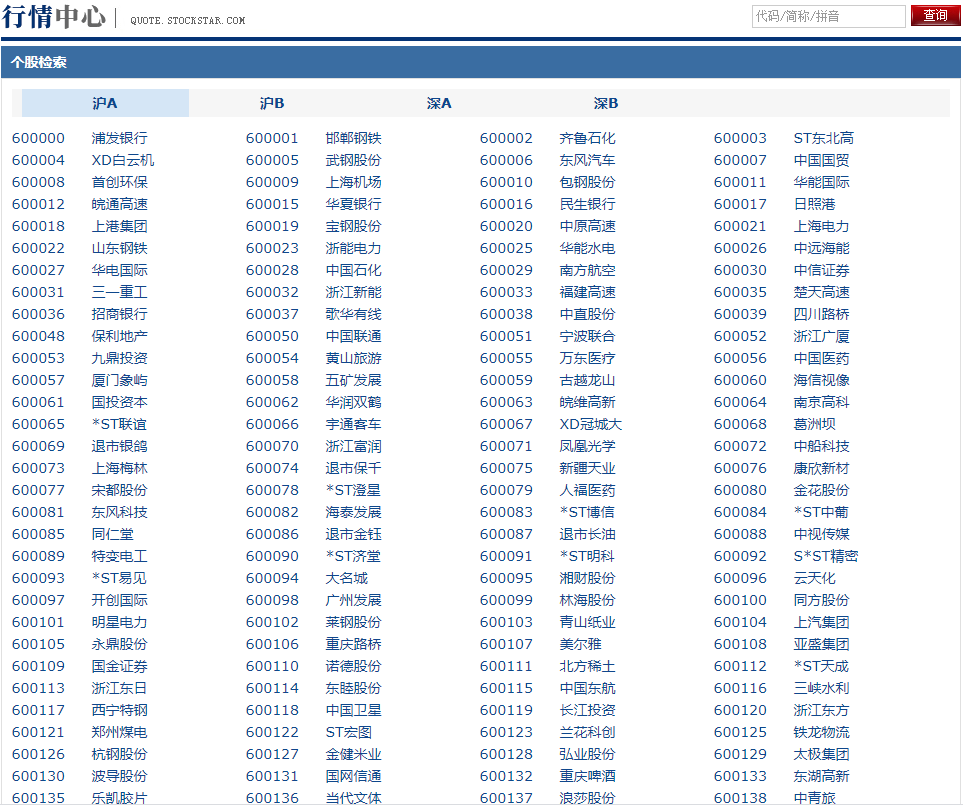
爬取目标
本例主要爬取某证券网站行情中心股票ID与名称信息,如下所示:
Scrapy爬虫开发
通过命令行创建项目后,基本Scrapy爬虫框架已经形成,剩下的就是业务代码填充。
item项定义
定义需要爬取的字段信息,如下所示:
class StockstarItem(scrapy.Item):
    """
    定义需要爬取的字段名称
    """
    # define the fields for your item here like:
    # name = scrapy.Field()
    stock_type = scrapy.Field()  # 股票类型
    stock_id = scrapy.Field()  # 股票ID
    stock_name = scrapy.Field()  # 股票名称
定制爬虫逻辑
Scrapy的爬虫结构是固定的,定义一个类,继承自scrapy.Spider,类中定义属性【爬虫名称,域名,起始url】,重写父类方法【parse】,根据需要爬取的页面逻辑不同,在parse中定制不同的爬虫代码,如下所示:
class StockSpider(scrapy.Spider):
    name = 'stock'
    allowed_domains = ['quote.stockstar.com']  # 域名
    start_urls = ['http://quote.stockstar.com/stock/stock_index.htm']  # 启动的url

    def parse(self, response):
        """
        解析函数
        :param response:
        :return:
        """
        item = StockstarItem()
        styles = ['沪A', '沪B', '深A', '深B']
        index = 0
        for style in styles:
            print('********************本次抓取' + style[index] + '股票********************')
            ids = response.xpath(
                '//div[@class="w"]/div[@class="main clearfix"]/div[@class="seo_area"]/div['
                '@class="seo_keywordsCon"]/ul[@id="index_data_' + str(index) + '"]/li/span/a/text()').getall()
            names = response.xpath(
                '//div[@class="w"]/div[@class="main clearfix"]/div[@class="seo_area"]/div['
                '@class="seo_keywordsCon"]/ul[@id="index_data_' + str(index) + '"]/li/a/text()').getall()
            # print('ids = '+str(ids))
            # print('names = ' + str(names))
            for i in range(len(ids)):
                item['stock_type'] = style
                item['stock_id'] = str(ids[i])
                item['stock_name'] = str(names[i])
                yield item
数据处理
在Pipeline中,对抓取的数据进行处理,本例为简便,在控制进行输出,如下所示:
class StockstarPipeline:
    def process_item(self, item, spider):
        print('股票类型>>>>'+item['stock_type']+'股票代码>>>>'+item['stock_id']+'股票名称>>>>'+item['stock_name'])
        return item
注意:在对item进行赋值时,只能通过item[‘key’]=value的方式进行赋值,不可以通过item.key=value的方式赋值。
Scrapy配置
通过settings.py文件进行配置,包括请求头,管道,robots协议等内容,如下所示:
# Scrapy settings for stockstar project
#
# For simplicity, this file contains only settings considered important or
# commonly used. You can find more settings consulting the documentation:
#
#     https://docs.scrapy.org/en/latest/topics/settings.html
#     https://docs.scrapy.org/en/latest/topics/downloader-middleware.html
#     https://docs.scrapy.org/en/latest/topics/spider-middleware.html

BOT_NAME = 'stockstar'

SPIDER_MODULES = ['stockstar.spiders']
NEWSPIDER_MODULE = 'stockstar.spiders'

# Crawl responsibly by identifying yourself (and your website) on the user-agent
#USER_AGENT = 'stockstar (+http://www.yourdomain.com)'

# Obey robots.txt rules 是否遵守robots协议
ROBOTSTXT_OBEY = False

# Configure maximum concurrent requests performed by Scrapy (default: 16)
#CONCURRENT_REQUESTS = 32

# Configure a delay for requests for the same website (default: 0)
# See https://docs.scrapy.org/en/latest/topics/settings.html#download-delay
# See also autothrottle settings and docs
#DOWNLOAD_DELAY = 3
# The download delay setting will honor only one of:
#CONCURRENT_REQUESTS_PER_DOMAIN = 16
#CONCURRENT_REQUESTS_PER_IP = 16

# Disable cookies (enabled by default)
#COOKIES_ENABLED = False

# Disable Telnet Console (enabled by default)
#TELNETCONSOLE_ENABLED = False

# Override the default request headers:
DEFAULT_REQUEST_HEADERS = {
  # 'Accept': 'text/html,application/xhtml+xml,application/xml;q=0.9,*/*;q=0.8',
  'User-Agent': 'Mozilla/5.0 (Linux; Android 6.0; Nexus 5 Build/MRA58N) AppleWebKit/537.36 (KHTML, like Gecko) Chrome/92.0.4515.131 Mobile Safari/537.36' #,
  # 'Accept-Language': 'en,zh-CN,zh;q=0.9'
}

# Enable or disable spider middlewares
# See https://docs.scrapy.org/en/latest/topics/spider-middleware.html
#SPIDER_MIDDLEWARES = {
#    'stockstar.middlewares.StockstarSpiderMiddleware': 543,
#}

# Enable or disable downloader middlewares
# See https://docs.scrapy.org/en/latest/topics/downloader-middleware.html
#DOWNLOADER_MIDDLEWARES = {
#    'stockstar.middlewares.StockstarDownloaderMiddleware': 543,
#}

# Enable or disable extensions
# See https://docs.scrapy.org/en/latest/topics/extensions.html
#EXTENSIONS = {
#    'scrapy.extensions.telnet.TelnetConsole': None,
#}

# Configure item pipelines
# See https://docs.scrapy.org/en/latest/topics/item-pipeline.html
ITEM_PIPELINES = {
   'stockstar.pipelines.StockstarPipeline': 300,
}

# Enable and configure the AutoThrottle extension (disabled by default)
# See https://docs.scrapy.org/en/latest/topics/autothrottle.html
#AUTOTHROTTLE_ENABLED = True
# The initial download delay
#AUTOTHROTTLE_START_DELAY = 5
# The maximum download delay to be set in case of high latencies
#AUTOTHROTTLE_MAX_DELAY = 60
# The average number of requests Scrapy should be sending in parallel to
# each remote server
#AUTOTHROTTLE_TARGET_CONCURRENCY = 1.0
# Enable showing throttling stats for every response received:
#AUTOTHROTTLE_DEBUG = False

# Enable and configure HTTP caching (disabled by default)
# See https://docs.scrapy.org/en/latest/topics/downloader-middleware.html#httpcache-middleware-settings
#HTTPCACHE_ENABLED = True
#HTTPCACHE_EXPIRATION_SECS = 0
#HTTPCACHE_DIR = 'httpcache'
#HTTPCACHE_IGNORE_HTTP_CODES = []
#HTTPCACHE_STORAGE = 'scrapy.extensions.httpcache.FilesystemCacheStorage'
Scrapy运行
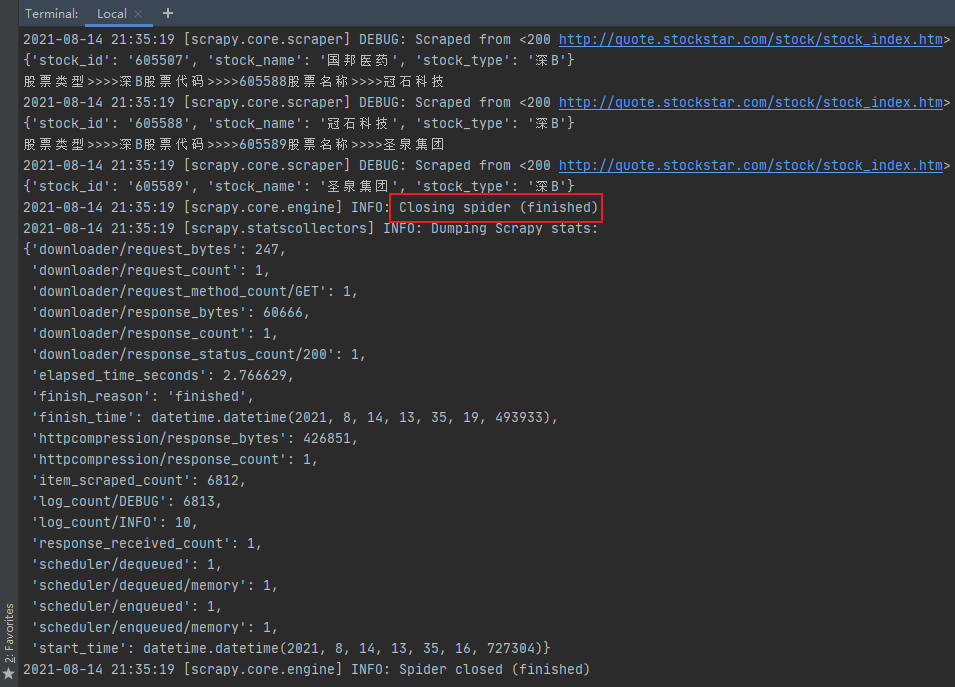
因scrapy是各个独立的页面,只能通过终端命令行的方式运行,格式为:scrapy crawl 爬虫名称,如下所示:
scrapy crawl stock如下图所示:
备注
本例内容相对简单,仅为说明Scrapy的常见用法,爬取的内容都是第一次请求能够获取到源码的内容,即所见即所得。实例源码